

So I made and canned some mango chutney this week, it's a good way to use up the surplus I have. I used Keitt mangoes from my neighbors tree. They are a good mango for chutney because of their firm nature. The recipe I used is from the book 'Ft Lauderdale Recipes' which is a reprint from the 60's that the Ft. Lauderdale Historical Society published. I canned the mango chutney so when mango season is over I can still get a nice mango taste. Finding canning jars down here in South Florida was a challenge in it's self, I looked everywhere and finally found them at the third Publix I went to. I wanted to share this great recipe I used naturally I embellished it slightly as I always do with recipes to suite my personal taste.
Mango Chutney (10 pints) (original recipe by Mrs. Henry O. Patton)
2 cups vinegar
6 cups sugar
2 quarts peeled or cubed mangoes ripe but firm
4 chili peppers(I used a habanero)
1/2 cup chopped green ginger root(I only had ground)
2 cloves of garlic
2 large onions, sliced
3 cups seedless raisins
1/2 teaspoon grated nutmeg
1 teaspoon salt
1/2 pound slivered almonds(I omitted these)
juice of 2 medium sized limes
1. In large kettle boil vinegar and sugar for about 5 minutes. Add all other ingredients and simmer for about one hour or until fruit is tender.
2. Spoon into hot sterilized jars and seal.
3. Put sealed jars in a canner with 1 inch of water covering the jars, bring to a boil and process for at least 20 minutes(and no more than 30 minutes) Adjust times for higher altitudes here's a great link with processing times, recipes and more http://www.freshpreserving.com/
4. Remove jars and cool in a draft free area, check seals after a few hours and jars that don't seal should be immediately refrigerated.
5. This chutney can be used on chicken or pork especially my favorite Jamaican Jerk Pork it's sweetness compliments the spicy pork perfectly. Here's more photo's of the process 1. Cooking the chutney.
 2. After a thorough hand wash with hot water and soap. Keep the jars warm until time to fill it helps soften the seals too (about a half hour before filling).
 3. Six out of six all of my jars sealed properly I've been 100% so far.
 4. The finished product only five jars left. I gave one away already! That's the green mango chutney I made earlier in the year on the left.
'Keitt' Mango Chutney by Eric Bronson is licensed under a Creative Commons Attribution-Noncommercial-No Derivative Works 3.0 United States License.
Based on a work at www.flickr.com
Friday, June 26, 2009
'Keitt' Mango Chutney
Monday, June 15, 2009
Making Ristras
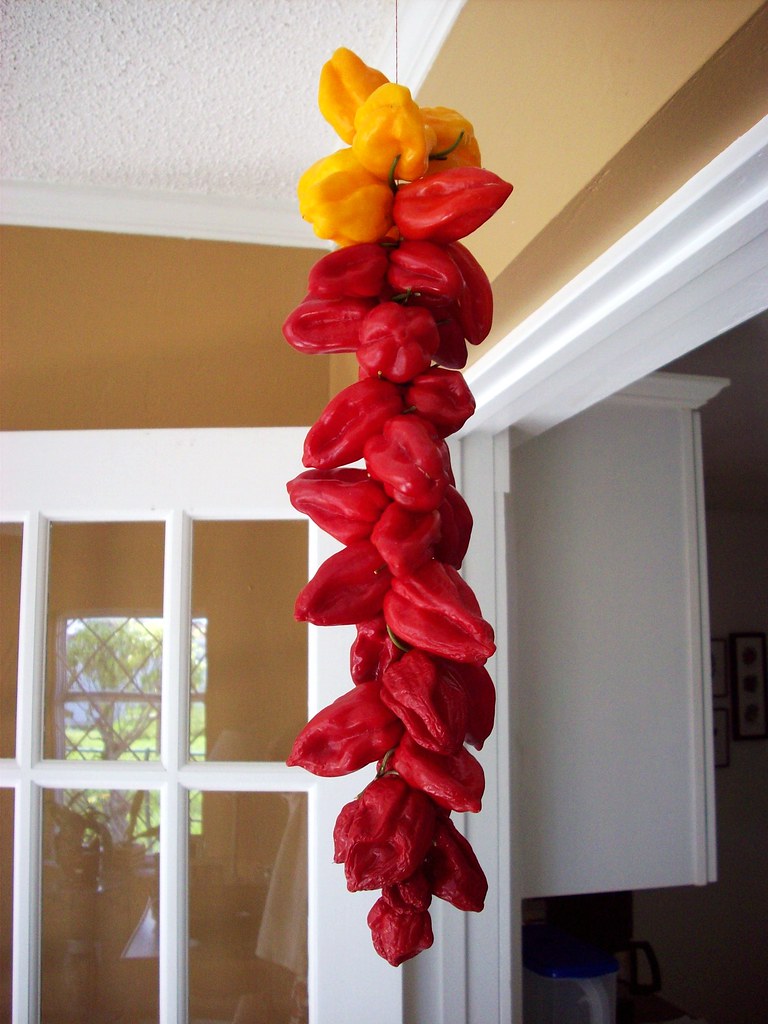 This is my first try at making a ristra. I'm making these as a way to preserve all the extra peppers I end up with! I used Habaneros here, but I grow many different varieties so it should be fun to see all the different kinds I end up with. I used a needle with thread but I think they method they describe on the University of New Mexico's Website would be a lot more effective. Now whenever I need peppers for recipes I'm making, I'll have all that I need right in the kitchen!
Eric
History of the ristras
From mid-September until frost, green chile matures and turns deep red. New Mexicans have traditionally harvested and strung red chile into colorful strings called ristras. The chile is allowed to dry in New Mexico's warm sun, then is stored--still on the ristra string--for use in various tantalizing food dishes during the winter.
When making chile ristras, select freshly picked, mature, red chile pods. If the chile still has a slight green coloration, put it in a cool, dark, but well ventilated place for two or three days. This will help it finish ripening and turn it a bright red.
Green chile is not acceptable for making ristras. Because it has not reached maturity, green chile will only shrivel and turn a dull orange color as it dries.
Allow red chile pods to set for two or three days after picking. This allows the stems to lose some of their moisture. In the ristra tying process, stems often break if they are too fresh. Good ventilation is important in the final drying steps. If fresh chile is bought in closed containers or plastic bags, take the chile out of the container or bag to avoid spoilage.
Excerpt from The University of New Mexico Circular 533
How to make a ristras
Materials needed
3/4 to 1 bushel red chile
Lightweight cotton string (package string)
Baling wire or twine
Begin by tying clusters of three chile pods on the lightweight string. To tie clusters, hold three chiles by their stems, wrap the string around the stems twice, bring the string up between two of the chiles, and pull tight.
Make a half hitch with the string and drop it over all three stems; pull the string tight. Pick up three more chile pods, and, in the same manner, tie another cluster about three inches above the first cluster. Continue until there are several clusters of three chiles, or until the weight makes it hard to handle. Break the string and start again; continue tying until all the chile has been used.
Suspend the baling wire or baling twine from a nail in a rafter or from a door knob. Make a loop in the loose end of the wire (twine) to keep chile clusters from slipping off. Some people like to use a wooden peg or dowel at the end of the wire or twine to keep chiles in place. Beginning with the first three chile pods (one cluster) tied to the package string, braid the chiles around the wire (twine).
The process is like braiding hair-the wire serves as one strand and stems of two chiles in the cluster are the other two strands. As the chile is braided, push down in the center to make sure of a tight wrap. Position the chiles to protrude in different directions. If this is not done, empty spaces can develop along one side of the ristra. Continue braiding until all the chile clusters are used.
Hang the completed ristra in full sun, either on a clothesline or from outdoor rafters where there is good ventilation. The chile can turn moldy and rot without proper air circulation for final drying. This would cause discoloration, which detracts from the ristra's natural beauty and, naturally, would preclude using the chile as food.
Excerpt from The University of New Mexico Circular 533Making Ristras by Eric Bronson is licensed under a Creative Commons Attribution-Noncommercial-No Derivative Works 3.0 United States License.
Based on a work at www.flickr.com